Google Tag Manager
Google Tag Manager is a technology from Google which allows all external tracking snippets to be hosted and configured using Google's tag management interface directly. The logic of including code on pages or not is handled by Google Tag Manager.
ConversionRuler works with Google Tag Manager with little or no modification, and can be configured to fire actions on specific pages using custom JavaScript code.
Contents
Installation
To install ConversionRuler using using Google Tag Manager, follow the instructions as follows.
Step 1: Create the ConversionRuler Landing Tag
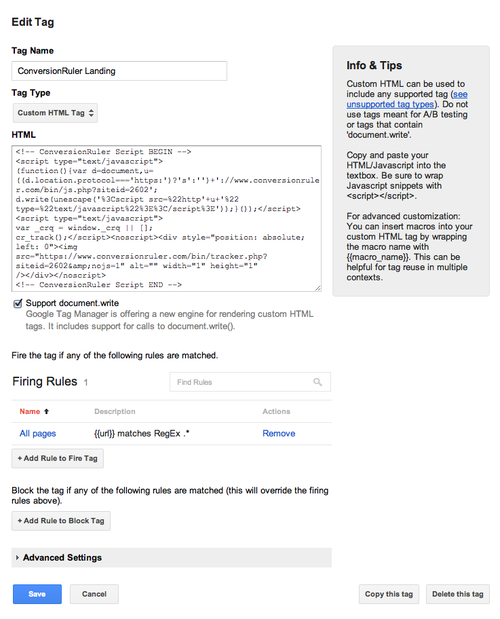
When adding the tag, name it appropriately, and cut and paste the code directly from the tracking snippet page.
- Make sure you check the box "Support document.write".
- Make sure you enter a "Firing Rule" which ensures it runs on all pages (you can select certain pages if you know what you are doing)
- When you are done, click Save
Step 2: Add actions to pages
Next, add an action for your site. Here, you'll want to consider a few things:
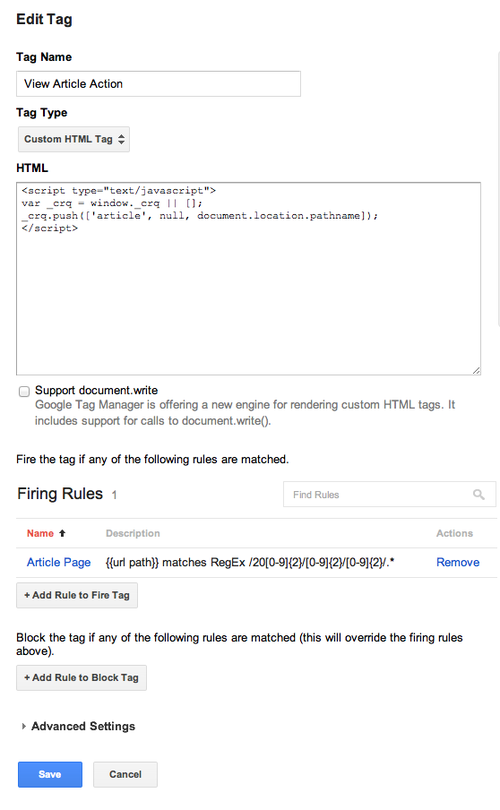
- You do not need to include all of the original landing snippet code - you just need to record your action. We recommend using the Tracking Queue method to simplify the snippet code.
- Ensure your action snippet is AFTER the landing snippet in Google Tag Manager
The code is as follows:
<script type="text/javascript">
var _crq = window._crq || [];
_crq.push(['article', null, document.location.pathname]);
</script>
Note that we do not need to check "Support document.write" in this case.
We are tracking action "article" and passing the slug of the article to ConversionRuler.
Note as well that we added a firing rule which limits this action to only be invoked on pages which appear like:
/2012/12/09/name-of-the-article-here
The pattern is:
/20[0-9]{2}/[0-9]{2}/[0-9]{2}/.*
And we match it against the Template:Url path pattern.
Step 3: Add any additional actions
Add any additional actions you wish to record by repeating Step 2 above for your site.
Step 4: Create a version and publish it
Google Tag Manager supports versions of your code and publishing various versions. To make your changes active, click Create Version when it's blue, and Publish when it's blue to make changes live on your site.
Step 5: Test, test, test
Remember to test your site. Writing JavaScript and code is not for the faint-hearted so if you find yourself having difficulties, get some assistance from a developer or someone who knows how to test your site. You can use Snippet Watch Mode to test that your code is firing correctly.
 Market Ruler Help

