ConversionRuler Reports
ConversionRuler reporting is available to users who have appropriate permissions to review and create reports. Reporting in generally available on a site-by-site basis, unless the logged in user is the account owner or has been assigned permissions for the account.
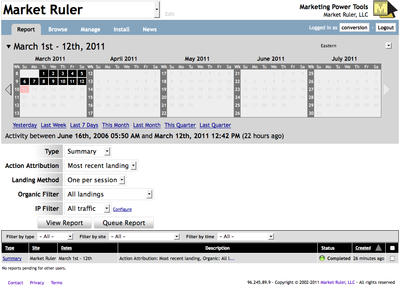
The reporting interface has a calendar at the top of the page with hyperlinks to select dates relative to the current date. Beneath the calendar are various options which may be used to choose the type of report to run, and then options which are related to that report.
Reporting is performed on a single site. The upper-left corner of the page displays the currently selected site and is a drop-down menu of all of the available sites in the account.
Calendar
The calendar displays ranges of dates based on the amount of collected data so far. If no data has been collected for a site, then the calendar will only allow the selection of the current day. If no data has been collected for a site, then it is best to install the tracking snippet, or if it has been installed already, then to run some test landings in order to generate data for the site. Because ConversionRuler is a real-time analytics solution, then data should appear within seconds of being recorded on a site.
To choose commonly used date ranges relative to the current date and time, choose a link:
- Today
- Yesterday
- This Week (starting from the preferred first day of the week for seven days, inclusive)
- Last Week (one week prior to This Week)
- Last 7 days is a seven-day period including the current day
- This Month is the current month, inclusive
- Last Month is the previous month
- This Quarter is the three months in the calendar year which includes the current date (e.g. January - March, April - June, etc.)
- Last Quarter is the quarter prior to This Quarter
Of course, you can choose any selection of dates for your report:
- To choose a single day, click twice on any date which is enabled in the calendar.
- To choose any week, click the left-most week number to select the entire week.
- To choose an arbitrary month, click on the month and year at the top of the calendar control.
- To choose any date range, just choose the start date, then the end date
The times chosen above are based on the current time zone which is shown in a pop-down menu in the upper right corner above the calendar. Typically, users will choose a time zone for a site based on its geographic location and never change it again. However, it sometimes is interesting to see Reports in a different time zone.
Report Types
The report types available are described in more detail by following these links:
Report Settings
These settings are available
- Action Attribution changes how actions are matched to landings
- Organic Filter enables you to include or exclude organic landings from your report results.
- IP Exclusion allows you to exclude IP addresses from a report.
- Offline Filter enables you to include or exclude online or offline actions selectively.
The big buttons
- View Report creates a report with the current settings, and switches to the report view page immediately.
- Queue Report creates the report and places it in the report list beneath it. You can review the report by clicking on links in the Type column.
Report list
The report list at the bottom of the screen shows the currently available reports.
The filters change what is shown in the list below automatically once selected. The Filter by site item has a special option called Current which filters the list based on the current site shown in the top left corner of the page.
The columns in this list are as follows:
- Type: The type of report
- Site: The site reported on
- Dates: The date range of this report
- Description: The actual settings used to generate this report.
- Status: Reports in progress will show a spinning "wheel" in the status column. Otherwise, it will show a green icon and "Completed" or a red icon and "Failed".
- Created: The time this report was created.
- The final column is a checkbox which makes it easy to delete all reports in the current list, or delete selective reports. Simply check the reports you wish to delete and click the Delete button at the bottom of the list. To delete all reports in the current list, check the topmost checkbox to check all reports, then click the Delete button.
Related
- Time Zones and how time information is recorded and reported
 Market Ruler Help